Serge, here is Shanes thickness caliper again

And here is a link to the post with several different home built tools etc.
| Official Luthiers Forum! http://www-.luthiersforum.com/forum/ |
|
| newbie question about thickness sanding http://www-.luthiersforum.com/forum/viewtopic.php?f=10102&t=4789 |
Page 1 of 1 |
| Author: | af_one [ Sat Jan 28, 2006 2:14 pm ] |
| Post subject: | |
I am just getting into this and hope you all can help. I see back and side sets with thicknesses from .090 to .185 and most are 3/16" thick. I plan on buying a benchtop sander but my question is: What grit do you sand with and to what thickness when starting to build the back and bend the sides?? |
|
| Author: | Pwoolson [ Sat Jan 28, 2006 2:23 pm ] |
| Post subject: | |
Welcome to the OLF! .185 would be an insanely thick back. I'm not saying it doesn't exist, but it probably shouldn't. I've got a dual drum sander so I have 60 grit on the first and 120 on the second. That's a luxury that most people don't have I realize. Before I had this machine I kept with 80 grit pretty much exclusively. I'd stop at around .110" and do the rest with a random orbital sander. Hope that helps. The problem with this question is you'll most likely get as many different answers as you will get responses. This one's pretty subjective. |
|
| Author: | Shane Neifer [ Sat Jan 28, 2006 4:14 pm ] |
| Post subject: | |
af_one.... As Pauk said, all kinds of thicknesses, largely depending on the strength of the wood you are using. Sides are typically between .080 and .090 and backs .090 and .110. You will typically get your woods (tops and backs) rough at 3/16 inch. I too use a double drum sander but since I sand a lot of sets as requested by my customers I run 60 and 80 grit. And as Hesh said, I think all of us sponsors have sanding capabilities, but you still want the parts oversized so you can glue them up and then let them sit for a bit, sand smooth, inlay and sand one time very close to your finished thickness. That's three trips through the sander, well, that is my process anyway. Good Luck Shane |
|
| Author: | Serge Poirier [ Sat Jan 28, 2006 4:23 pm ] |
| Post subject: | |
Hi Shane, while you're at thicknesses, would it be possible to show us your thickness caliper that you built, i bought myself a dial caliper from Lee Valley today and thought about yours that was quite nice and wanted to build something similar, it would probably be a good tool for af-one to build himself for a few bucks as well! TIA. Serge |
|
| Author: | Rod True [ Sat Jan 28, 2006 5:32 pm ] |
| Post subject: | |
Serge, here is Shanes thickness caliper again
And here is a link to the post with several different home built tools etc. |
|
| Author: | Shane Neifer [ Sat Jan 28, 2006 6:25 pm ] |
| Post subject: | |
Thanks Rod...I would have had to search through the files for it! Hey! How's the new one? Is every one home and doing well? Shane |
|
| Author: | Colin S [ Sat Jan 28, 2006 9:33 pm ] |
| Post subject: | |
My finished backs usually end up about 95 thou depending on wood density, with sides almost always at 80-85 thou. I do have a 16-32 but it only ever gets used for the very final thicknessing, if I remember, and then I still finish off with the ROS and scraper. In fact the 16-32 will soon find it's way on to eBay. For the amateur building doing 3 or 4 guitars a year the SafeT planer for pre-joining thicknessing and then the drill press sanding disc are the simple and cheap option I also find that the drill press sanding disc leave a superior finish to the 16-32. Colin |
|
| Author: | sfbrown [ Sun Jan 29, 2006 12:28 am ] |
| Post subject: | |
[QUOTE=Hesh1956] Paul is absolutely correct but here is another answer for you. I have been watching the DVD "Build a Steel String Guitar" by our own Robbie O'Brien and he has another cost effective way to thickness your back, top, and sides. He uses and shows you how to use a Wagner Saftey planner in the DVD. This is a clever and safe little tool that requires a drill press and about $49 to buy it. It's available at Woodcraft, LMI, Stew-Mac, etc. I just bought one but prior to this I bought my wood from places that would thickness sand it for me. Many of our OLF vendor will do this and since they are all guitar builders too they know what we want in thicknessing. A drum sander is the next major purchase for me and my bathroom shop (long story... people have to be sick of it by now...).[/QUOTE] I too, have used the safety planer but I have one word of warning; if you are planing anything other than a very straight-grained wood, this planer can and will take a chunk out of an edge possibly rendering the side too thin for use. Ask me how I know this. I was able to salvage the side (it was a funky grained rosewood) but the sides of this guitar are about 1/8" narrower than I wanted. Regards, Steve |
|
| Author: | Pwoolson [ Sun Jan 29, 2006 1:01 am ] |
| Post subject: | |
[QUOTE=Hesh1956] Paul is absolutely correct but here is another answer for you. I have been watching the DVD "Build a Steel String Guitar" by our own Robbie O'Brien and he has another cost effective way to thickness your back, top, and sides. He uses and shows you how to use a Wagner Saftey planner in the DVD. This is a clever and safe little tool that requires a drill press and about $49 to buy it. It's available at Woodcraft, LMI, Stew-Mac, etc. I just bought one but prior to this I bought my wood from places that would thickness sand it for me. Many of our OLF vendor will do this and since they are all guitar builders too they know what we want in thicknessing. A drum sander is the next major purchase for me and my bathroom shop (long story... people have to be sick of it by now...).[/QUOTE] I used one for awhile, or shall I say I TRIED to use one. One word of warning is that if your table isn't perpendicular to the arbor you'll get swirl grooves from the planer. My drill press is a piece of junk so I spend a great deal of time shimming the table to be true. Then I realized that the arbor runnout was also an issue. So I did away with the safe-t-planer. It's a great tool and I'd use it if I could but it's got to have a decent machine running it. |
|
| Author: | Cocephus [ Sun Jan 29, 2006 2:07 am ] |
| Post subject: | |
Af One, if you have the means and a small amount of room to sacrifice, I would suggest making yourself a thickness sander (some call it a drum sander). I made two of them so far, and really like the second one, having seen first hand what they are capable of. I was surprised to find how accurate it really is! In a nutshell, it`s a roller 9" in dia. by 22" long with a 3/4" steel shaft through the length with bearings at each end. I made mine from a 2" x 10" 12 ft long that was left over from my construction days. A 1/3 hp motor, with a 1" pulley, and an old fan belt. Now that I look back on it, I think I might have 20 bucks in it total. If you want more info on it, don`t hesitate to ask! |
|
| Author: | Arnt Rian [ Sun Jan 29, 2006 2:20 am ] |
| Post subject: | |
Cocephus, you have a 9" dia. roller on your sander? That's pretty large compared to most I have seen, people usually make them around 4". What is it made of, and why did you make it that big? How does it work? (I'm about ready to build mine you see, the joy of hand planing curly bubinga is over...) |
|
| Author: | Cocephus [ Sun Jan 29, 2006 3:16 am ] |
| Post subject: | |
Here`s my version of a thickness sander. Simple but quite effective. 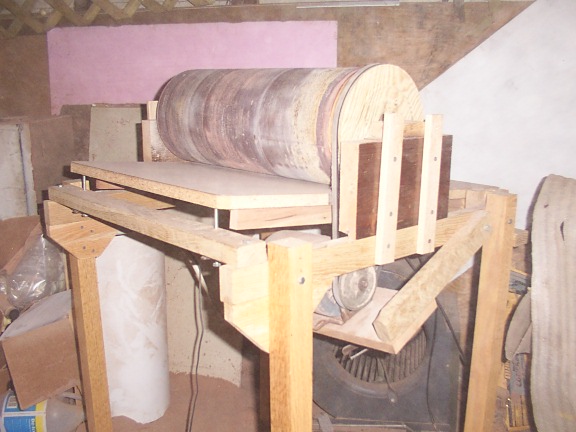
Yes, the roller is 9" in diameter. IMHO, a bigger roller and slower rpm`s would result in better accuracy and less wear on abrasives. Worked for me. As stated earlier, I made the roller from a 2x10x12` pine plank left over from construction days. Lots of 9" circles cut that day. After layout, I drilled the center holes, cut out squares, cut 45`s on each corner to reduce material, and glued them up with grains alternated 90 degrees and opposing, if that makes sense. After a day of drying time, mounted it on bearings countersunk into the ends. Then mounted it to the frame and put the motor on a swing-arm so that tension would be taken care of by gravity. The belt went around the drum, hence no need for a pulley. I applied 36 grit abrasive to a flat pice of counter top material and used that to true up the roller. Stay tuned... |
|
| Author: | Cocephus [ Sun Jan 29, 2006 3:27 am ] |
| Post subject: | |
After I got the roller close to true (it shook like the dickens until it balanced out), I cut a pulley groove into the right end of the roller. From there, I went to 80 grit abrasive and finished the trueing. By my calculation, the roller is turning around 600 rpm, give or take. When it was ready, I used 3M spray adhesive to put the cloth abrasive on it. I want to stress using a cloth type abrasive. Holds better and safer. For the pressure to roll on the cloth I cranked up the feed table tight to the roller and rolled it by hand to make sure it had adhered. |
|
| Author: | Cocephus [ Sun Jan 29, 2006 3:43 am ] |
| Post subject: | |
One more addition to this post, and I`ll quit being so long winded. This machine is really accurate to within .002". I use it alot for many things other than backs and sides, too. Now for the safety warnings. Using a larger roller, it`s alot easier to get fingers and other appendages into the roller. I use a flat plate or a push stick, and NEVER get close to the back side of the roller where you might get sucked into it (it`ll take a finger nail off in no time flat). DUST! This thing is notorious for making dust. I had my dust shield taken off for the pics (and it`s also time to change the cloth). Do whatever you have to do to avoid that dust! Collection system, respirator, etc... |
|
| Author: | Serge Poirier [ Sun Jan 29, 2006 4:41 pm ] |
| Post subject: | |
Thanks Rod for the picture, hope it was not too much of a hasle  ? Great thickness caliper indeed Shane, i found some nice silver tubing that i'm gonna put to work! i'l post pics when it's done. ? Great thickness caliper indeed Shane, i found some nice silver tubing that i'm gonna put to work! i'l post pics when it's done.
Hi Cocephus, i checked your drum sander and it's pretty cool with that 9 " roller! I made my roller out of 3" black ABS plastic tubing which doesn't require trueing, i only cut 2 - 3" dia. plywood discs 3/4" thick to insert at each end of the drum with holes for the shaft. Here's a couple of pics 1-with the dust collection protection 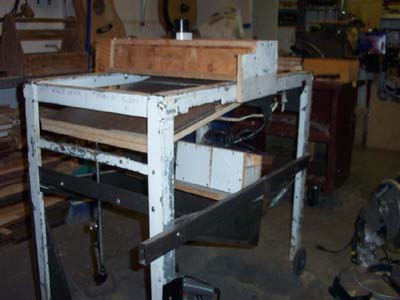
2-the belt guard 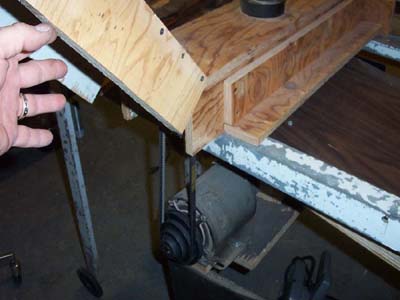
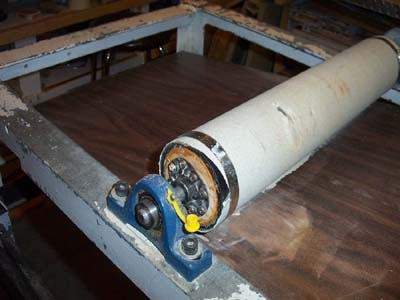
3- you can see here the ABS drum with inserted plywood dics BTW, if you have a safer way to attach the paper, let me know 
4- A single 1/2" threaded rod wit 2 welded nuts on 2 different bars to keep it goin' straigth and pushing on a metal plate screwed underneath the table preventing the rod to screw in the table. 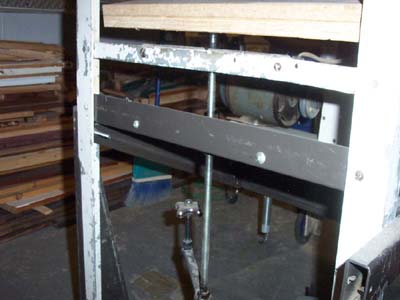
|
|
| Author: | Serge Poirier [ Sun Jan 29, 2006 4:55 pm ] |
| Post subject: | |
Oh i forgot, thanks also for the link Rod, great stuff that should be on the jigs page, i'll copy that tomorrow though! G'night all Serge |
|
| Author: | Cocephus [ Sun Jan 29, 2006 6:04 pm ] |
| Post subject: | |
Serge, your pics look alot like the first one I made. Almost scary! Did you have to reduce your rpm`s at the roller to keep from burning up abrasive, wood, and bearings? That`s the reason I went for a larger roller. It wouln`t have to turn so fast as to burn things up. The slower rpm`s also save on my bearings, too. You might think that I sacrificed power, but it`ll throw things clear accross the shop! As far as adhesives go, I use 3M 77 spray contact adhesive and cut the edges of my cloth to fit exactly so there won`t be any snags during operation. When it`s time to change it, just tear it off, wipe the roller with laquer thinner and you`re ready to go again. |
|
| Author: | Colin S [ Sun Jan 29, 2006 9:00 pm ] |
| Post subject: | |
[QUOTE=sfbrown] I too, have used the safety planer but I have one word of warning; if you are planing anything other than a very straight-grained wood, this planer can and will take a chunk out of an edge possibly rendering the side too thin for use. Ask me how I know this. I was able to salvage the side (it was a funky grained rosewood) but the sides of this guitar are about 1/8" narrower than I wanted. Regards, Steve[/QUOTE] As with any tool, it only works well if the set up is right. That means a decent drill press and a level table, preferably with a fence and hold down. The blades also need to kept in tip top condition. I have thinned plates of every description with mine and never had any problem with tear out. My final thicknessing is with the drill press sanding disc, which I have always made, though I believe LMI now sells one. I find I get a better finish than I do from redundant 16-32. For the amateur builder, not out for speed, They make far better economic sense. Colin |
|
| Author: | Serge Poirier [ Sun Jan 29, 2006 10:42 pm ] |
| Post subject: | |
Yeah i guess you're right Cocephus, i'll either have to increase the drum size or reduce at the roller cuz my drumamajigger turns way too fast and thanks for the tape tip! 
Rod and Ron, you guys also have great drum sanders! Serge |
|
| Author: | sfbrown [ Sun Jan 29, 2006 10:50 pm ] |
| Post subject: | |
[QUOTE=Colin S] [QUOTE=sfbrown] I too, have used the safety planer but I have one word of warning; if you are planing anything other than a very straight-grained wood, this planer can and will take a chunk out of an edge possibly rendering the side too thin for use. Ask me how I know this. I was able to salvage the side (it was a funky grained rosewood) but the sides of this guitar are about 1/8" narrower than I wanted. Regards, Steve[/QUOTE] As with any tool, it only works well if the set up is right. That means a decent drill press and a level table, preferably with a fence and hold down. The blades also need to kept in tip top condition. I have thinned plates of every description with mine and never had any problem with tear out. My final thicknessing is with the drill press sanding disc, which I have always made, though I believe LMI now sells one. I find I get a better finish than I do from redundant 16-32. For the amateur builder, not out for speed, They make far better economic sense. Colin [/QUOTE] Colin, You may be right. If I had pics to show you, I would as the circumstances may have been unusual. The planer took out a "scallop" shaped piece of wood on the edge where the grain curved out of the side after dipping down into the side a few inches before. I cannot fault my setup. I made an adjustable auxillary fence and my drill press is about 6 months old and running very true. I had also done about half a dozen sides before without mishap. So, as I said, I think if you stick to straight-grained wood, you should be OK. btw, how do you sharpen the blades on your safe-T-planer? There weren't instructions with mine. Regards, Steve |
|
| Author: | Colin S [ Sun Jan 29, 2006 11:12 pm ] |
| Post subject: | |
Steve, you can download Stew Macs SafeT planer instruction here:- SafeT planer I've never had problems, as I said, even with highly figured woods. including some very flat sawn Brazilian. Sharpness is the key and I sharpen my cutters before every major job on back and sides using Stew Macs method, the cutters can be sharpened many times and a new set of cutters is much cheaper than a set of wood. I also have a hold down both sides of the cutter to ensure the wood doesn't lift. I tend to use the drill press mounted sanding disk for the last 1mm or so of thicknessing, gives a silky fine finish. Colin |
|
| Author: | Scott Thompson [ Mon Jan 30, 2006 5:00 pm ] |
| Post subject: | |
Another vote for the safe-T planer. I hated it when I first tried to use it, but after setting it all up correctly, I love it. I can take wood down to almost final thickness with barely any tool marks. As Colin said - flat and aligned table, a fence (VERY important for control), hold downs and sharp blades. |
|
| Page 1 of 1 | All times are UTC - 5 hours |
| Powered by phpBB® Forum Software © phpBB Group http://www.phpbb.com/ |
|